

Pin for later:


I need to preface this post by saying that I am truly a complete beginner when it comes to sewing! Prior to this, I had sewn part of a quilt cover (under supervision of an instructor) that I never finished, and two peacock costumes for Halloween last year (actually I only sewed the feather parts). I'm not sure how I got it into my head that I should attempt to make pillow covers like these, without even a pattern to go by, but I did and I just love how they turned out! So seriously, if I can do it, anyone can! Plus, I already did all the hard parts for you by figuring it all out ;-p ....
Supplies:
To make a cover for a 14 inch pillow, you will need:
◆ fabric - 1 patterned, 1 coordinating plain (flannel) - (I can't remember the dimensions of the fabric, I just told the lady at the counter that I was making a cover for a 14 inch pillow, as a complete beginner, and she told me I should cut each piece to 16 inches and then she gave me what she thought I needed. I had more than enough.)
◆ coordinating thread
◆ scissors or a rotary cutter and mat
◆ sewing machine
◆ pins
◆ pencil
◆ chopstick
◆ possibly a seam ripper - a beginner sewer's best friend!
Notes:
Fabric: I like flannel because it is nice and soft and snuggly for little ones, but you could use whatever you like. For the lobster ones, the patterned fabric is plain cotton, while the plain side is flannel. The others are all flannel. You will want to prewash and iron the fabric. I used colour guard sheets to prevent colours from running, and I did the plain red fabric separately, even from the lobster fabric. The colour guard sheets from that one (I used 2) came out dark pink, so separating it was a good call.
Stitches: I used a straight stitch with the length set at 2 on my machine. Where indicated, I used a zigzag stitch with the length set at 2. At the beginnings and ends, I did a few reverse stitches to hold the stitches better by going forwards for a few stitches, then back for a few, then forward again. (I'm sure this has a proper name, but I don't know what it is!)
Cut the patterned fabric in a 16 inch square. (Draw out the outline on the back side of the fabric.) Then cut an additional separate 3-3.5 inch strip (you will use this for the lettering).
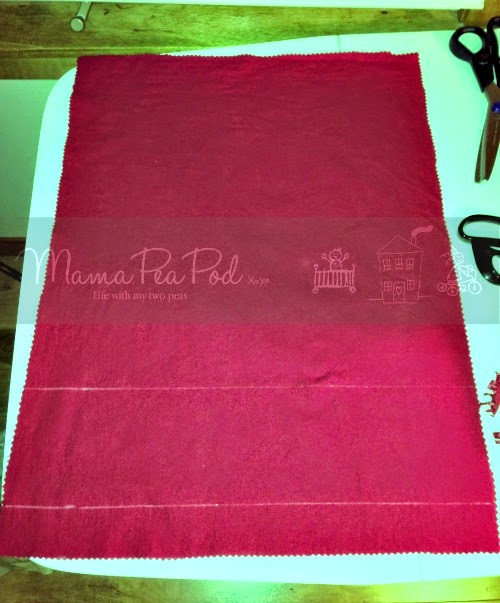
On the plain fabric, mark out a 16 inch square, then mark out another 4 inches on one end for the flap, then another 1-1.5 inches beyond that for the seam. Cut around the whole shape, so you get a rectangle with a line marking where the 16 inch square ends and where the 4 inch flap ends. It will look like this after you cut around the outside of the shape:
Fold over the top edge of the patterned fabric and sew a hem. (If your patterned fabric has a 'right way up' for the pattern, you want to hem the side along the top of the pattern.) I sewed a 3/8 inch hem, and then went back and sewed it again at about 1/4 inch (hold it just so that the outer edge covers the hole in the middle of the foot), so there are two lines of stitching along it. You could fold it over twice before sewing for a more finished looking seam, but it doesn't matter too much as it will be hidden under the flap. Your choice.
Then on the plain fabric, fold over the flap end twice, so that the final fold is along the line you marked out, about 1-1.5 inches from the end. Again, sew a hem as you did before. (This seam will show as it will be the end of your flap at the front.)
On your lettering strip, begin by making sure the top and bottom edges are straight (I just used a ruler to draw out a straight line along each edge). Then cut out the letters you need. You want them to be 3 inches tall. You can draw them onto the back side of the fabric first, if you like, but remember that they will be mirror imaged. Or you can just freehand cut them. I made my letters as blocky as possible to make them as easy as possible, and I didn't bother cutting out holes in the middle of letters (see the A and B in Abel below, for example).
Lay out the plain fabric right side up so that the flap is nearest you. Place the letters along the flap, facing towards you (the seam you made is the bottom of the flap, so the letters should be standing along it, a little above the seam). Pin in place - I suggest making sure that each 'leg' of the letters has its own pin to hold it in place. Also, by making the letters tilted this way and that, you don't need to worry about having them all in a straight line and helps to disguise any mistakes!
Set your machine to zigzag stitch and stitch carefully around all the letters. This part takes the longest and is the trickiest bit. You might want to hand turn the machine for a few stitches at each corner.
Hold it up and admire your handiwork.
 |
| You might notice that in the picture above, the seams are not yet sewn. I did this one before I realized it would be better to do the seams first. Also, the flap is not yet folded here. You should really fold it before pinning, otherwise you have to unpin the end to fold the flap in and repin. I was still figuring it all out at this point. |
Next, place the 2 pieces of fabric together, right sides facing inwards. The flap will extend beyond the top end of the patterned fabric. (If your patterned fabric has a 'right way up' for the pattern, you want it to be set so that the top of the pattern is at the flap end of the plain fabric.) Fold the flap inside, between the two pieces of fabric, as in the picture below. Pin around the 3 edges that are not the top.

Sew along the 3 pinned edges, about 3/8 inch in. (You could make it about 1/2 inch and would likely still have enough space - my pillow covers are loosely fitted.)
Turn inside out and poke the corners with a chopstick or something else pointy but not sharp, so that they make nice pointy corners. Turn the flap over the front. Iron flat.

Pop the pillow in and congratulate yourself on your accomplishment!

*This post contains affiliate links for your convenience.


