.

Showing posts with label {Music Play}. Show all posts

{Fly Away Butterfly - Easy Colourful Puppets}


Fly Away Butterfly:

Easy Colorful Butterfly Puppets Crafts for Preschoolers


We've been watching this Butterfly Colors Song video on YouTube over and over and over again. My girls (aged 6 and 3) love it. My 1st grade beginner EAL students love it. And it's a fun resource for teaching colours.


red butterfly puppet for young children to make


We made easy butterfly puppets to go with the video so we could perform along with it on the screen. 


preschooler making butterfly puppet

Simply cut out a butterfly shape (I used the die-cutter [affiliate link] at school since I was making them for a whole class, but you could easily draw your own template or print one from here). We made one per child per colour, so six butterflies each. At school we made them single-sided with a craft stick [affiliate link] on the back, but the ones we made at home were double-sided, with the craft stick glued in between.


yellow butterfly puppet craft

Then have your child colour the butterflies to match the colours in the video. You can also have them add further decoration with sequins, glitter glue, tissue paper, feathers, [affiliate links] etc. in the same colour.

Then play the video and have your butterflies dance along as you sing the song together!

https://www.e-junkie.com/ecom/gb.php?ii=1346032&c=cart&aff=219646&ejc=2&cl=206960

Photobucket


{Mermaid Party}


Did you know that Mama Pea Pod was voted in the Top 10 websites in the Red Tricycle Most Awesome awards for Birthday Party Ideas! Thanks so much! x


mermaid birthday party food table

Princess Pea is turning 5 this month, and we had her mermaid-themed birthday party last weekend. It was so much fun! From the preparations, to the games, to the food, to the amazing cake my friend made for her, it was non-stop giggles and laughs for me, her, and all of her friends!


I debated breaking this up into several posts, as it was such a great party and I have so much I want to share! But, since it would take me forever to prepare multiple posts, I'm just going to share the highlights here with you, and I'll divide this post into several sections instead.


1. Decorations:


I already shared our homemade 3D mermaid party invitations. Here's what else we did to set the stage for the mermaid theme.

mermaid birthday party place settings

We ordered mermaid-themed plates, cups, napkins, and placemats online, and for the boys, I picked up pirate-themed dinnerware. I got blue and turquoise tablecloths and cutlery from a party supply store and cut them to the size of their kiddie tables.

mermaid party backdrop decorations

This is my new favourite way to decorate for kids' parties! I picked up some mermaid-themed wrapping paper and put it up on the wall next to their tables with sticky tack. Simple, easy, and makes them feel like they're 'in' the theme. It also made a perfect backdrop for party pictures later on.

mermaid party decorations

A friend had given us some adorable sea-life wall stickers a while back, so we put them on the window temporarily, between the 'seaweed' streamers that were hanging down. And, of course, we hung blue, turquoise, and 'sea foam green' streamers from the lights and hung balloons in the same colours.

I had also really wanted to attach some fisherman's netting to our deck space, but we didn't have anything to attach it to. I've since had hooks added to the underneath of our upstairs balcony for future party decorating! ;-)

2. The Food


Another way we 'set the stage' was with the food itself. What do mermaids eat?

mermaid party food octopus dip
Octopus dip
(I found this idea on Pinterest here)

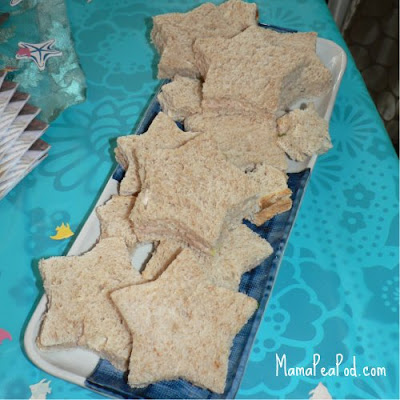
mermaid party food starfish sandwiches
Starfish sandwiches

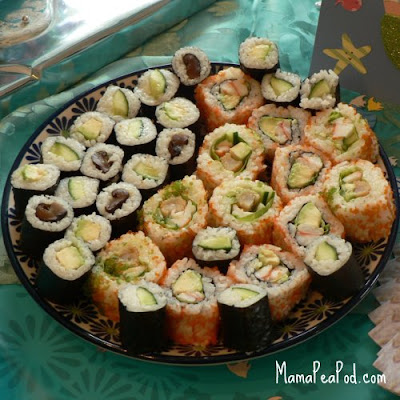
mermaid party food sushi
and sushi!

 mermaid birthday cake

Oh, and sparkly mermaid cake, of course!
(obviously, I've deleted her name from the picture)
This cake was made by my super-talented friend, Masha. Don't you just love the edible glitter on the mermaid's tail?

mermaid party rainbow birthday cake

Make that sparkly, rainbow mermaid cake!

3. Creating Little Mermaids


mermaid birthday party games


As the guests arrived, we turned them each into Little Mermaid Princesses. They each got some turquoise 'mermaid hair' to clip on; some sparkly, turquoise 'mermaid bangles'; a 'seaweed necklace' (a green, leafy lei from the dollar store); and some 'mermaid shimmer cream' to rub onto their arms and faces if they wished. 

Then they set to work decorating their own mermaid princess crowns.

mermaid birthday party wave crowns

I had prepared the crowns by cutting out a rectangle of stiff, gold card, and cutting a wave design along one edge. I punched holes in each side, and tied on some elastic (about 25-30 cm long).
I set up a 'crown station' in the corner of the living room. The girls had a selection of sequins, fake jewels, tiny bits of sparkly sticky-backed craft foam, stickers, and wooden fish and starfish shapes to stick on.


mermaid birthday party decorating crowns


They were a hit, and so cute on all the little mermaid princesses!
(Oh, and check out the mural we made with the girls' handprint mermaid painting and some scraps of bulletin board borders!)


mermaid birthday party jewelled crowns

4. Games and Activities


We had SO much fun with our games and activities! I always figure the sign of a good kids' party is no tears - well, the kids spent the whole 3 hours laughing non-stop. So I guess that's the sign of a GREAT party!


We played Mermaids and Pirates - Daddy made an excellent pirate (all kitted out with his foam pirate hat and cutlass!), chasing the girls all over the garden. We set up 'safe zones' on each side of the garden using hula hoops, and the mermaids had to run across without getting caught by the pirate. If they got caught, they became pirates, too. They LOVED this game!

mermaids and pirates party game

mermaids and pirates island party game

It was so popular that later we played another variation of it: Fishing for Mermaids - this time Daddy had a 'fishing net' (a piece of pink netting with beads threaded into it that we just happened to have) that he chased them with.

Next up was Under the Sea Limbo. I used the mop handle and decorated it with blue and green ribbons, as seen on Pinterest. The girls had a blast going under and over it to the music. (This has since become their party game of choice for every party!)

mermaid party ribbon limbo game

Next we had an Under the Sea Dance - to the tune of the same name from The Little Mermaid soundtrack, of course, I called out the names of sea creatures and they had to use their dramatic play skills to 'dance' like the creature. Much hilarity involved in this one! 

mermaid birthday party under the sea dance game
Dancing Crabs

mermaid party dance game crabs
Dancing fish


mermaid party dance games fish
Dancing octopus

The Funny Face Contest was a lot of fun - and they especially enjoyed getting to see all their funny faces on the TV right afterwards, as we hooked the camera up to the HDMI.

party games funny face contest

birthday party games funny face competition

birthday party games silly faces

party games funny faces

And finally, we had some Underwater Bubble Blowing - I set out a tub and filled it with bubble solution (I used the 1L refill bottle of Tesco brand bubbles as I find they make really good bubbles, and the ingredients to make homemade bubbles are hard to find and expensive here, but I also like the Super Miracles Bubbles brand, which we can't buy here). I set out a selection of bubble wands that I had picked up for a couple of dollars at Michael's last summer. They enjoyed making bubbles of all sorts of shapes and sizes, and in no time the entire garden was filled with bubbles. I must admit, I love a garden full of bubbles!

mermaid party games underwater bubbles blowing

party games blowing bubbles mermaid birthday

All in all, I'd say it was one of our best parties ever, and probably the one that I enjoyed the most myself!

mermaid party birthday girl


Happy Birthday to my big girl! 

Love you!
x


https://www.e-junkie.com/ecom/gb.php?ii=1346032&c=cart&aff=219646&ejc=2&cl=206960


If this is your first time visiting, welcome! Please take a look around using the buttons and labels on the right and below. I'd love for you to also come join our Mama Pea Pod Facebook community, where you'll find lots more party, play, and parenting posts shared from the best of the blogosphere.

You might also be interested in these party posts:

Photobucket

2014 Blogger Planner, Calendar, and Menu Planner from Mama Miss

{Make a DIY Rainstick}

Making a DIY Rainstick


Making a DIY rainstick has been high on my 'fun and creative crafts I must do with the kids' list for a long time now, and I've been saving just the right tube for it ever since my friend Nathalie got inspired by this rainstick at The Imagination Tree and wrote a guest post for me about her attempts at it. But it never seems to get done. Well, now, at last we made our rainstick!


Considering how long I'd let it slide down our priority list of crafts, it turned out to be surprisingly fast and easy to do! We definitely took Nathalie's experience and advice into account. Like nailing at an angle instead of straight in. But in the end, we made it quite differently from Nathalie's.


We used a cardboard tube that had had glowsticks in it last summer. It's small but thick and hard - you definitely couldn't do this as well with a paper towel tube, it has to be hard and strong.


We nailed lots of nails in, then filled it with expired rice. I covered the end with lots of tape and even wrapped tape over the whole tube to cover any potential pointy nail heads.


Then we covered ours with homemade 'mod podge' (white glue mixed with water) and torn tissue paper strips. I was a bit concerned by the sogginess at first.


But once dry, it became hard and smooth.

And what a lovely sound it makes!

Photobucket

{Guest Post: I-Spy Animal Rain Stick}


I know I usually do a 'Happy Monday' post about something that makes me happy. This week's is a little different. What I'm really happy about today is my first guest post by my friend Nathalie! (cheer!)

Nathalie is incredibly talented and spends her 'free' time making loads of amazing toys for her cute almost-two-year-old daughter (ask her about the play kitchen she's working on....or the felted food!). I've been begging her to write about some of her projects, so here is the first one she is sharing with us.

This is based on another super creative idea from The Imagination Tree (LOVE that blog!). After reading the link I posted on the Mama Pea Pod facebook page, Nathalie decided to give the DIY rain stick a try, and it's superb! She had to make a few adjustments along the way, and she wrote about her (mis)adventures in making it for all you lovely Mama Pea Pod readers. (I'm definitely going to be trying to make one of these - I love them!) Now, take it away, Nathalie!

My good friend Mama Pea Pod has been inspiring me since the very first post! I have so many plans now for my 2 year old and me, that I need to learn how to organize our time better. I have also discovered that I am a little perfectionistic… and that I’m trying to impose that trait/flaw??? on my daughter’s activities, instead of letting her be creative and learn by herself that her ways of achieving goals are good, even if they are different from mine. This crafts time together will be a learning time for me too!

After a few weeks of work, here is our own “Rain/ Find the Animal stick”.

I followed The Imagination Tree's instructions, but trial and error were the best helpers.


First I found a hard cardboard cylinder. It has to be hard in order to hold nails that will be hammered through. The length and width may vary, I just made sure E (my toddler) was able to handle it easily.


I also used many, many nails, I think over 90… all of which were a little too long and stuck out slightly on the other side of the cylinder (the ideal length is for them to just touch the other inner side of the cylinder).


This is where my dear sister, who is very straight forward and does not skimp on words when you’ve made a mistake, called my attention to:

a) why not use appropriate sized nails and avoid an extra step…(of which I’ll tell you about later), and

b) if the nails were too long, why didn’t you put them in with a slight angle? (to help the flow of the “rain”…)


Anyways, the harm was already done and I just wanted to move on. So, the nails were hammered in following a double spiral pattern with about  1 cm between nails. This distance should vary depending on the size of what you’ll use as “rain”.

Next, E helped me gather some small rocks from the park (very much like the ones used to cover soil in plant pots, small and white) and we put them through the cylinder to test their size. They were small enough to go through the stick slowly and make a nice sound, and not too big to get stuck between the nails. We also tried dried beans and corn kernels, but I had in my head the idea that rocks would last longer and not go bad… E helped me wash and dry them (not that it is needed, she just loves water and I thought it was a good, extra activity to get out of this).


After filling the stick with the correct amount of rocks (play with it until you find the sound you like), I sealed the sides using some cardboard cut to shape and a hot glue gun.


And then, the extra step for me… since the heads and tips of the nails were too long and stuck out, I decided to cover the whole cylinder with paper mache to hide them and avoid future emergencies like cuts and scrapes… (This extra step cost me a few more days, since I had to let the layers of paper dry . Next rain stick I make, I’ll certainly make it easier!)


To finish, I decided to use some very cute animal stickers that I had bought for E a while ago and thought too pretty to waste on daily drawing paper. So we painted the stick with white acrylic paint, E placed the stickers all over and I brushed it with a layer or two of slightly diluted white glue to hold the stickers down and to give it a shiny finish. 


Now we have a pretty rain stick and animal finder!

Thanks so much, Nathalie, this looks fantastic! 

Photobucket

Also, see another way to make a rainstick here!

Check out the link below for more great craft ideas!

Texas Monkey